

I was not so interested in the C-54 Skymaster transport before, however a friend of mine gave me a Revell kit of the C-54 in 1/72 scale at the beginning of 2023,
and I was quite impressed with the quality of this kit and I started building the C-54 kit in March 2023.
This is a quite luxurious kit with several Eduard photo-etched parts included. The box art of this luxurious kit is the Thunderbird's C-54.
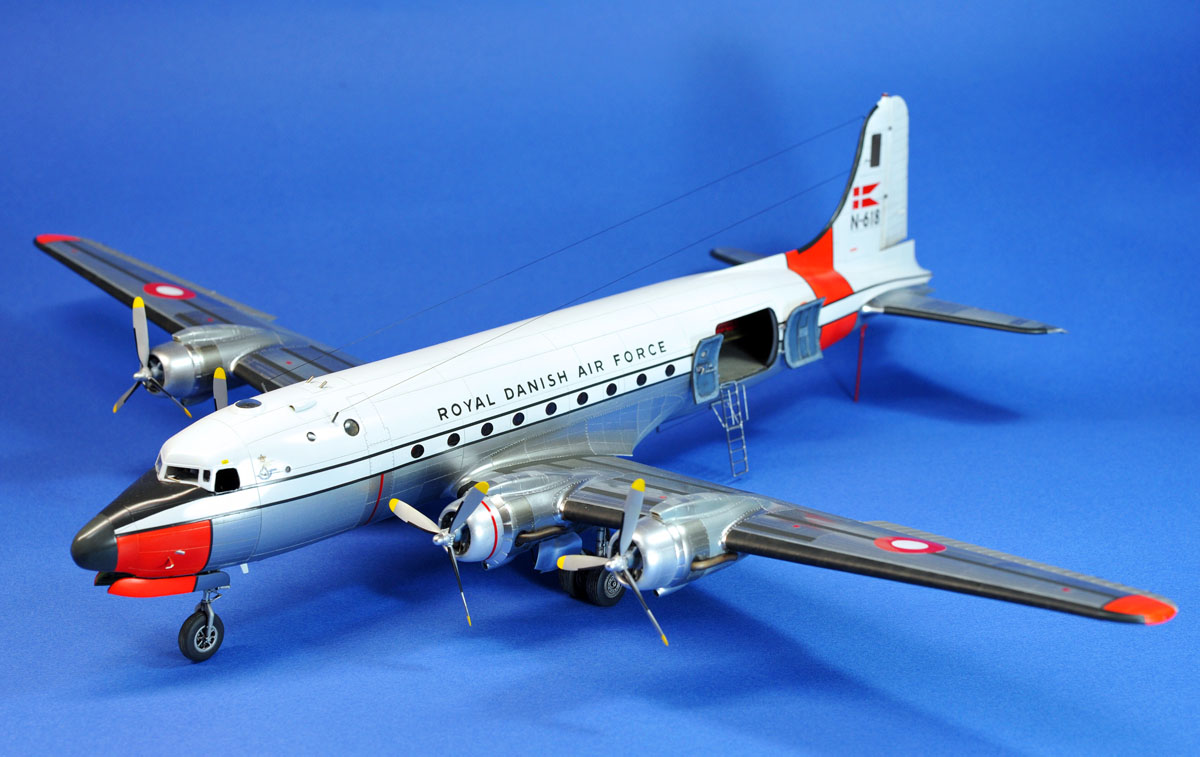
I finished this C-54 model in the Roral Danish Air Force paint scheme and markings,
mainly because most of the surfaces of the Danish C-54 are natural metal finish and I wanted to apply lots of rivet lines on the silver surfaces.
Also, I like the Dayglo nose, wing-tips and the fuselage band of the Danish C-54.
You can enlarge all the photos on this page by clicking on images.

܂ 
Nose Section Kishu-Bubun


(Above 2 photos),
I used kit parts only together with some photo-etched parts for the instrument panel, seat-belts, throttle lever, etc.
I did not add any hand-made parts for detailing the cockpit.


(Above 4 photos),
I used a LED light to illuminate the cockpit.
The top left photo shows the battery, the switch and the LED light I used.
I installed the battery and the switch under the cabin floor as shown on the top right photo.
The LED light is placed on the top of the cockpit wall behind the two seats as shown on the bottom left photo.

.


 (These 3 photos),
Compartments for the navigator and the radio operator are immediately aft of the cockpit and the kit includes a lot of parts to assemble the compartment section.
However unfortunately, these compartments are NOT visible from the outside after the model is completed.
So, frankly speaking, I did cut corners to build this section as shown on these photos(Ha-Ha !! ).

.


 (These 3 photos),
The top two photos show the vertical wall in the nose wheel well.
I added some details (brass wire & nickel-silver wire) on the wall as shown on the top right photo.
The bottom left photo shows all the walls inside of the nose wheel well.
(These 3 photos),
The top two photos show the vertical wall in the nose wheel well.
I added some details (brass wire & nickel-silver wire) on the wall as shown on the top right photo.
The bottom left photo shows all the walls inside of the nose wheel well.

.


(Above 3 photos),
The overhead console was placed inside of the clear cockpit part as shown on the most left photo.
I cut off the side windows (both left & right) and the clear part was glued over the cockpit.
You can look into the illuminated cockpit through the side window as shown on the most right photo.

Fuselage 胴体部


 (These 3 photos),
As shown of the top left photo, I cut off the window area from the fuselage side and I put a clear plate (long and thin) into the narrow opening for the windows.
After I glued the clear plate into the fuselage opening, I sanded the clear plate to fit in the curved surface of the fuselage as shown on the bottom left photo.
(These 3 photos),
As shown of the top left photo, I cut off the window area from the fuselage side and I put a clear plate (long and thin) into the narrow opening for the windows.
After I glued the clear plate into the fuselage opening, I sanded the clear plate to fit in the curved surface of the fuselage as shown on the bottom left photo.

.


 (These 3 photos),
The inner lining parts have window openings too on the fuselage side, and the lining parts are placed on the inside surface of the fuselage halves.
After the fuselage halves are glued together, I placed the oval-shaped masking sheet on the clear plate at right on top of the window openings of the inner lining as shown on the bottom left photo.
(These 3 photos),
The inner lining parts have window openings too on the fuselage side, and the lining parts are placed on the inside surface of the fuselage halves.
After the fuselage halves are glued together, I placed the oval-shaped masking sheet on the clear plate at right on top of the window openings of the inner lining as shown on the bottom left photo.

.


 (These 3 photos),
The troop sheets are glued on both sides of the cabin floor as shown on the top right photo.
The seat back portion is the photo-etched part painted in red.
Unfortunately, most of the troop seats are NOT visible from the outside after the fuselage halves are glued together.
(These 3 photos),
The troop sheets are glued on both sides of the cabin floor as shown on the top right photo.
The seat back portion is the photo-etched part painted in red.
Unfortunately, most of the troop seats are NOT visible from the outside after the fuselage halves are glued together.

Wings Shuyoku


(These 4 photos),
The top two photos show the detachable mechanism of the fuselage and the wing.
I used the two sizes of the brass pipes to make this mechanism.
The diameter of the brass pipe glued to the wing is a little smaller than that of the pipe glued to the fuselage.
The fitting of these two pipes is properly tight, and you can smoothly remove the wings from the fuselage.
The dihedral angle of the wing is VERY important in building the aircraft model.
So, I hand-made a simple gauge by using the styrofoam to measure the right dihedral angle as shown on the bottom left photo.
The bottom right photo shows the dihedral angle of my C-54 model is properly fixed.

.


(These 4 photos),
I added a lot of small details by using mainly nickel-silver wire in the main wheel well.
I always add fairly heavy details in the wheel wells, even though the area is seldom seen by other modellers.
So, my friends often tell me "You always waste your efforts" (Ha-Ha).
However, my modelling hobby is just for my self-satisfuction, and I don't care about my friends' comments.

.


(These 4 photos),
This kit includes a lot of parts to assemble the engine cowlings, and many of the parts are NOT visible from the outside.
I used the nickel-silver wire for the push rods, but I ignored all the spark plug cords.
This kit includes the cowl flap parts in both open and closed positions.
Unfortunately, I lost one of the cowl flap parts in the closed position, so I had to use one part in the open position as shown on the top right photo.
As a matter of fact, I did find the lost part in a drawer near my modeling table a few weeks after the C-54 model was finished. TOO LATE. (Ha-Ha ! )

.


 (These 3 photos),
I used the aluminium pipe for the exhaust pipe.
Judging from the photos of the actual C-54, the Danish aircraft carried a fairly long exhaust pipe,
so I carefully bent the aluminium pipe according to the shape depicted on the photos. (please refer to the top two photos)

Landing Gears Kyaku


 (These 3 photos),
I assembled the nose landing gear by using kit parts mostly.
The only addition was a short brass wire as shown on the top left photo.
The nose gear is quite fragile, but the kit parts are very good enough.

.


(Above 5 photos),
I used a Japanese traditional tool (for carpenters) named "Kebiki" to engrave the grooves around the wheel (refer to the top most-left photo).
I placed the wheel part on the Kebiki's flat bed, and rotated the wheel by hand in pressing against the sharp edge of the Kebiki as shown on the top-center photo.
I engraved a total of six parallel grooves all around the wheel.

.


(Above 4 photos),
These photos show how I assembled the main landing gear strut.
The kit parts are fairly good enough, but I added some more details by using brass wire (for the brake lines) and some photo-etched parts included in this luxury kit.

Other Small Parts Komono-Buhin


(Above 4 photos),
Most of the control surfaces (except the flaps) are fabric covering, so I put some additional work on the flat control surfaces.
At first, I glued thin plastic strips on the surface at even intervals as shown on the top left photo.
Then, I applied green putty on the plastic strips, and then I sanded over the putty to smoothen the angular edge of the plastic strips.
I painted the fabric covering in matt silver or in matt white.

.


 (These 3 photos),
I glued the front entrance door in open position inward as shown on the top left photo.
I also fixed the two cargo doors in open position as shown on the top right photo.
The bottom left photo shows the antennas/aerials to be fixed on the fuselage and on the vertical fin.
I used a stretchable wire for the aerial and I used the flattened brass pipe for the support of the aerial.
(These 3 photos),
I glued the front entrance door in open position inward as shown on the top left photo.
I also fixed the two cargo doors in open position as shown on the top right photo.
The bottom left photo shows the antennas/aerials to be fixed on the fuselage and on the vertical fin.
I used a stretchable wire for the aerial and I used the flattened brass pipe for the support of the aerial.

Riveting


 (These 3 photos),
I used the wheel-type riveting tools, double wheel & single wheel, as shown on the bottom left photo.
I also used another type of riveter, which I hand-made from the metal pipe (something like an injection needle),
in order to engrave round marks on the surface for larger fasteners.
You can find some larger round rivet marks on the top two photos together with a lot of smaller rivet lines which I scribed by using the wheel-type riveters.

Painting Tosou


 (These 3 photos),
I made a time-consuming efforts to airbrush the silver area.
I prepared ten or so silver paint with different silver tones, and I airbrush one panel by another panel as shown on the top two photos.
I used the green masking sheet to airbrush the letters/numbers "ROYAL DANISH AIR FORCE" and "N-618" as shown on the bottom left photo.
As for the fine black lines at above and below the windows, I used the Hasegawa's Finish Sheet instead of airbrushing the black paint over the masking sheet,
simply because it is much easier.

Finally completed Kansei Shima-shita
Outdoor Photography


Indoor Photography


Top of this page
the Previous page
TOP Page