
I used to live in Torrance(near LA) California between 1990 and 1994, and I visited fire fighting(tanker) bases near Los Angeles quite frequently
including Hemet-Ryan Airport and Foxfield Airfield. I became very interested in all the colorful fire fighting tankers including S-2, P-2, P-3, C-54 and especially C-119.
My first visit to Hemet was in 1990 and I saw a couple of C-119s on the airfield.
Unfortunately, I did not see them flying at all, and I thought they had already been retired from service by that time.
The Italeri kit is a very good kit as a base of my C-119 project.
I made some modifications to change the Italeri's C-119G transport to the C-119C(Not a G-model) fire fighting aircraft.
My modifications are as follows. You can enlarge all the photos on this page by clicking on images.
Quarter-century later, I met the Hemet-based C-119 again at Pima Air Museum in Tucson, Arizona in 2017 (see the photo shown below),
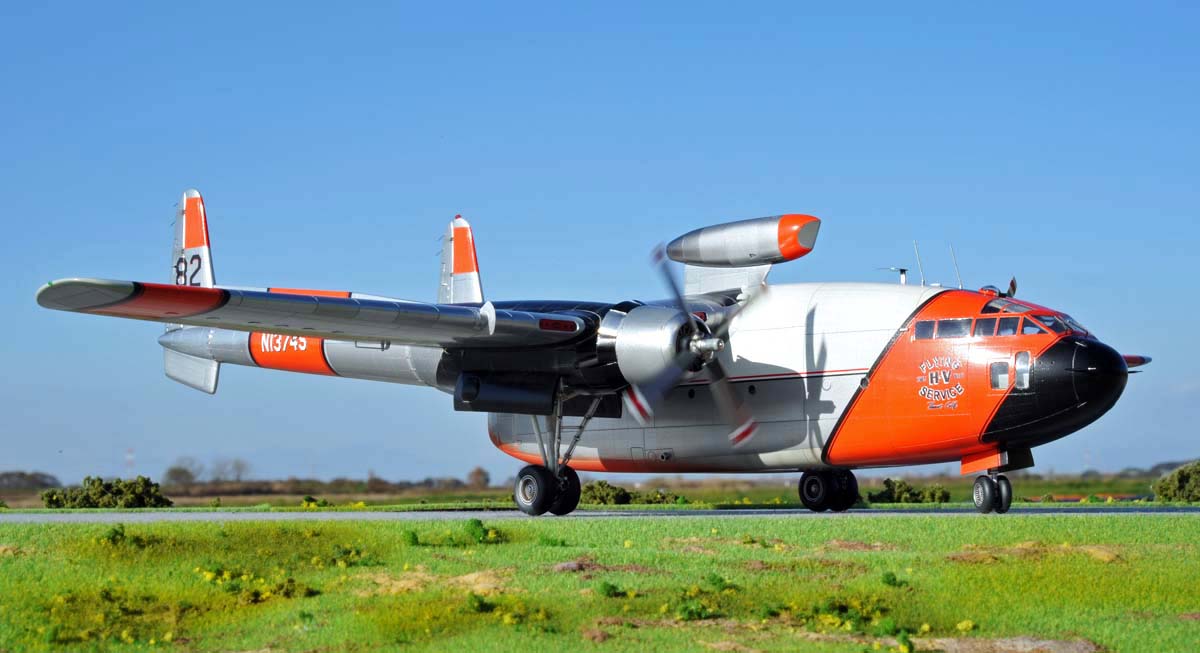
and I decided to build the 1/72 model of the Hemet C-119 with DRAW decal depicting the C-119C Tanker #82 operated by the Hemet Valley Flying Service.
The top left photo shows my C-119 model in 1/72 scale, and I took the top right photo at Foxfield near Edwards AFB in 1992.
This Tanker #82 is still displayed at Foxfield.
彫惗偑儘僗傾儞僛儖僗峹奜乮僩乕儔儞僗巗乯偵挀嵼偟偰偄偨1990乣1994擭摉帪丄儘僗峹奜偺怷椦徚壩婡儀乕僗偵傛偔弌妡偗偰丄幨恀傪嶣偭偰偄傑偟偨丅
堦斣傛偔峴偭偨偺偑 Hemet-Ryan Airport 偱丄帺戭偐傜侾帪娫敿偺僪儔僀僽偱偟偨丅
摉帪偙偙偱偼攈庤側揾憰傪巤偟偨S-2, P-2, P-3, C-54, C-130 偦偟偰彫惗偺戝岲偒側C-119偑尒傜傟傑偟偨丅
偟偐偟側偑傜丄偙偺C-119偑旘傫偱偄傞偲偙傠偼尒偨偙偲偑柍偔丄嫲傜偔1990擭帪揰偱婛偵尰栶傪堷戅偟偰偄偨傛偆偱偡丅
偦傟偐傜巐敿悽婭屻偺2017擭丄彫惗偼傾儕僝僫廈僣乕僜儞偺僺儅峲嬻攷暔娰偱丄Hemet Valley Flying Service偺C-119C偵嵞夛偟傑偟偨乮壓嵍偺幨恀乯丅
偦傟偠傖偁C-119偺僾儔儌傪怷椦徚壩婡偱嶌偭偰傒傛偆両偲巚偄丄DRAW僨僇乕儖偐傜摨婡偺僨僇乕儖偑敪攧偝傟偰傞偙偲傕攚拞傪墴偟偰偔傟偰丄2018擭俈寧偵偵僀僞儗儕偺1/72僉僢僩傪嶌傝巒傔傑偟偨丅
忋塃偺幨恀偼彫惗偑1992擭偵Foxfield偱嶣塭偟偨Hemet婎抧偺C-119C乮僞儞僇乕#82乯偱偡丅忋嵍偺幨恀偼摨偠偔僞儞僇乕#82偺1/72柾宆偱偡丅

1, The C-model's engine and propeller are different from the G-model(kit) ones, so I modified the engine nacelle, exhaust pipe, cowl flap and proprller blade to the G-model shape.
2, I used a 1/72 Hasegawa P2V-7 kit parts to add a jet engine on top of the fuselage.
3, I engraved the panel lines for the water bay doors on the bottom surface of the fuselage.
4, Cut out the exhaust outlets (four pieces) on the roof of the fuselage.
5, The roof antennas are arranged in accordance with the Hemet C-119 configuration.
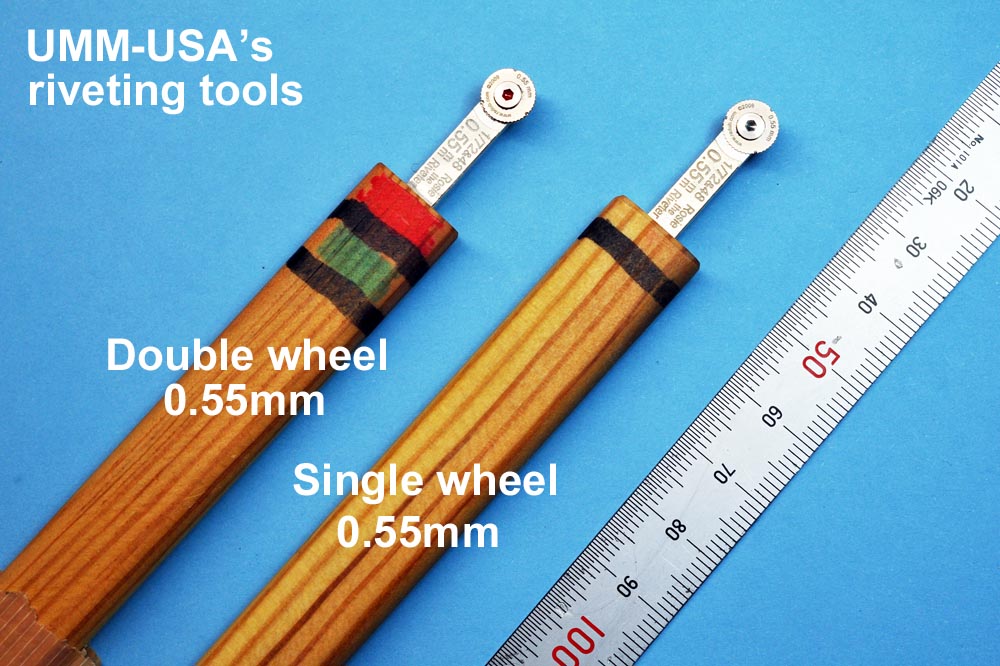
This time, I used wheel-type riveting tools to engraved fine rivet lines all over the aircraft surfaces. Also, I painted the natural metal surface by using Mr.Hobby's metalic paint.
C-119C怷椦徚壩婡偼僀僞儗儕偺C-119G(1/72乯傪儀乕僗偵偟偰嶌傝傑偟偨丅僉僢僩偺俧宆偲僞儞僇乕#82乮俠宆乯偱偼嵶偐偄強偱偄偔偮偐偺嵎堎偑桳傞偺偱丄偦傟偼埲壓偺夵憿傪峴偄傑偟偨丅
侾丄俠宆偲俧宆乮僉僢僩乯偲偱偼僄儞僕儞傗僾儘儁儔偑堎側傞偺偱丄僄儞僕儞僫僙儖傗攔婥娗丄僾儘儁儔側偳傪夵廋偟偨丅
俀丄怷椦徚壩婡偱偼摲懱忋偵僕僃僢僩僄儞僕儞偑捛壛憰旛偝傟偰偄傑偡偑丄偦傟偼僴僙僈儚偺P2V-7僉僢僩偐傜棳梡偟偨丅
俁丄摲懱壓柺偵悈僞儞僋偺曻悈僪傾傪嬝挙傝偱昞尰偟偨丅
係丄摲懱忋柺偺攔婥摏乮寁係杮乯傪愗傝庢傞丅
俆丄摲懱忋柺偺傾儞僥僫椶偼幚婡幨恀傪挷傋偰偦傟偵崌傢偣偰庢傝晅偗偨丅
婡懱昞柺偵偼僐儘僐儘幃偺儕儀僢僩懪偪岺嬶傪巊偭偰丄慡懱偵嵶偐偄儕儀僢僩傪懪偪崬傒傑偟偨丅柍揾憰偺婡懱昞柺偼Mr.Hobby偺儊僞儖僇儔乕偱揾傝傑偟偨丅
僋儕僢僋偱杮儁乕僕撪偺慡偰偺夋憸傪奼戝弌棃傑偡
Cockpit丂僐僢僋僺僢僩


 (these 3 photos),
The cockpit assembly is almost "Out of the Box", and I only added some small details including the seat belts (thin lead sheet), the throttle levers(brass wire)
and radio & equipment panels (colored photo-etched parts from my junk box).
(these 3 photos),
The cockpit assembly is almost "Out of the Box", and I only added some small details including the seat belts (thin lead sheet), the throttle levers(brass wire)
and radio & equipment panels (colored photo-etched parts from my junk box).
亂忋嵍3枃亃丄
僐僢僋僺僢僩偼僉僢僩晹昳傪巊偭偰慺捈偵慻傒棫偰傑偟偨丅庒姳偺僨傿僥傿乕儖傾僢僾傕偟傑偟偨偑丄僗儘僢僩儖儗僶乕傗僔乕僩儀儖僩丄
偦偟偰儔僕僆摍偺寁婍斦乮僕儍儞僋偺僄僢僠儞僌晹昳乯傪捛壛偟偨掱搙偱偡丅偳偆偣奜偐傜偼傎偲傫偳尒偊傑偣傫偺偱丅
.
Cabin windows丂僉儍價儞憢


 (these 3 photos),I did not use the clear kit parts for the cabin windows due to the heavy distortion of the lens.
Instead, I glued the thin clear circular sheet from the back side as shown on the top left photo.
After that, I applied(poured) the clear UV resin/gel onto the circular dent from the front side.
After the gel was cured, the front surface became flush and flat as shown on the top right photo.
The bottom left photo shows the clear UV resin which I purchased at a "One hundred yen shop", like a dollar shop.
(these 3 photos),I did not use the clear kit parts for the cabin windows due to the heavy distortion of the lens.
Instead, I glued the thin clear circular sheet from the back side as shown on the top left photo.
After that, I applied(poured) the clear UV resin/gel onto the circular dent from the front side.
After the gel was cured, the front surface became flush and flat as shown on the top right photo.
The bottom left photo shows the clear UV resin which I purchased at a "One hundred yen shop", like a dollar shop.
亂忋嵍3枃亃丄
僉儍價儞憢偵偮偄偰偼丄摟柧晹偺榗傒偑僸僪僀偺偱丄僉僢僩晹昳偼巊偄傑偣傫偱偟偨丅
戙傢傝偵丄墌宍偺摟柧僾儔斅傪棤懁偐傜愙拝偟丄昞懁偐傜偼孍傒晹暘偵昐墌僔儑僢僾偱攦偭偨倀倁僋儔僼僩儗僕儞塼傪枮偨偟傑偟偨丅
儗僕儞偑屌傑傞偲丄塃忋幨恀偺擛偔昞柺偼柺堦偺暯柺偲側傝丄偦偙偦偙鉟楉側憢偑弌棃忋偑傝傑偟偨丅
.
Fuselage assembly丂摲懱愙拝
 I took the left photo immediately before I glued the fuselage halves together.
I applied several tension rods verticaly and horizontaly in order to reinforce the structural strength of the fuselage section.
The structural strength was needed because I engraved the rivet lines after the fuselage halves were glued.
I took the left photo immediately before I glued the fuselage halves together.
I applied several tension rods verticaly and horizontaly in order to reinforce the structural strength of the fuselage section.
The structural strength was needed because I engraved the rivet lines after the fuselage halves were glued.
摲懱嵍塃傪愙拝偡傞捈慜偺摲懱撪懁偺巔偑偙偺幨恀偱偡丅僉儍價儞撪偵偼廲偲墶曽岦偵偮偭偐偊朹傪愙拝偟傑偟偨丅
偙傟偼丄摲懱愙拝屻偵僐儘僐儘幃儕儀僢僩懪偪岺嬶傪巊偭偰丄昞柺慡懱偵儕儀僢僩傪懪偪崬傓偨傔偵丄偁傞掱搙偺摲懱嫮搙偑昁梫偵側傞偲峫偊偨偨傔偱偡丅
.
Wing joint丂庡梼愙崌


(Above 4 photos),
I did put some additional work to reinforce the structural strength of the wing joint area.
The top left photo shows the joint area of the original kit parts, and it looks very weak in structure.
So, I made the aluminium socket (see above photos) to be placed on the inboard side of the wing.
I also glued a couple of plastic strips on the outboard side of the wing,
and these plastic strips were inserted into the aluminium socket on the inboard side of the wing as shown on the above photos.
亂忋4枃亃丄
庡梼晹昳偼嵍忋幨恀偺擛偔丄撪梼晹偲奜梼晹偵暘妱偝傟偰偄傑偡丅
偦偺愙崌晹暘偼傎偲傫偳亀僀儌晅偗亁忬懺偱嫮搙偵晄埨偑桳偭偨偺偱丄偪傚偭偲柺搢廘偐偭偨偺偱偡偑丄忋偺幨恀偺擛偔曗嫮岺嶌傪峴偄傑偟偨丅
傑偢丄奜梼懁偐傜俀杮偺妏嵽乮庽帀乯傪撍偒弌偟偰丄偦傟傪庴偗傞撪梼懁偺僜働僢僩傪傾儖儈斅偲妏朹偱嶌傝傑偟偨丅
嵟廔揑偵偼椉幰傪愙拝偟偰丄屌掕偟傑偟偨丅
.
Main wheelbay丂庡媟屔


(above 4 photos),
The top left photo shows the original kit part for the main wheel bay.
The bay looked too shallow by using the original kit part, so I made the opening on the rear half of the kit part as shown on the top left photo.
I did put some details on the c?eiling area of the rear portion of the bay.
亂忋4枃亃丄
庡媟廂擺屔偼僉僢僩晹昳偺傑傑偱偼梋傝偵傕愺夁偓偰丄偙傟偱偼偲偰傕幵椫偑廂擺偱偒傑偣傫乮嵍忋幨恀乯丅
偦偙偱丄僉僢僩晹昳偺屻傠敿暘傪偔傝敳偄偰丄屻傠敿暘偺廂擺屔傪幚婡摨條偵怺偔夵憿偟傑偟偨丅
偦傟偵敽偄丄廂擺屔偺揤堜晹暘偵傕偦傟側傝偺僨傿僥傿乕儖傪嶌傝傑偟偨丅
.
Engine nacelle丂僄儞僕儞僫僙儖


(above 4 photos),
"C"-model engine is different from the "G"-model engine of the kit design, so I made some modifications on the engine nacelle.
The top left photo shows how I modified the lower nacelle part.
Also, I replaced the plastic cowl flaps with thin aluminium sheet without cutout for the exhaust pipe.
The original kit part is shown on the bottom right photo(at most right), and it has two cutouts on the cowl flaps for the exhaust pipes.
亂忋4枃亃丄
僉僢僩偼俧宆傪儌僨儖壔偟偰偄傞偑丄怷椦徚壩婡乮僞儞僇乕#82乯偼俠宆偺夵憿婡偱偡丅
椉宆偱偼憰旛偟偰偄傞僄儞僕儞偑堎側傞偨傔丄僄儞僕儞僫僙儖傗僇僂儖僼儔僢僾偺宍忬偑堎側傝傑偡丅
嵍忋偺幨恀偱偼僫僙儖屻曽壓柺偺晹昳傪斾妑偟偰偄傑偡丅俠宆偱偼攔婥娗傪捠偡愗傝寚偒偑偁傝傑偡丅
僇僂儖僼儔僢僾偼傾儖儈斅偱嶌傝捈偟傑偟偨偑丄俧宆偵偁傞攔婥娗梡偺愗傝寚偒偼丄俠宆偺僇僂儖僼儔僢僾偵偼偁傝傑偣傫丅
.

Propeller丂僾儘儁儔


 (4 photos),
The shape of propeller for the C-model is different from the shape of the kit part(G-model).
Firstly, the blade for the C-model is narrower, so I cut and shaved the blade to make it the correct shape.
Also, the shape of the hub is different too. The hub for the C-model propeller is quite slender,
so I cut off the hub of the kit part and replaced it with the hub of the C-97 kit(Academy, 1/72) part.
(4 photos),
The shape of propeller for the C-model is different from the shape of the kit part(G-model).
Firstly, the blade for the C-model is narrower, so I cut and shaved the blade to make it the correct shape.
Also, the shape of the hub is different too. The hub for the C-model propeller is quite slender,
so I cut off the hub of the kit part and replaced it with the hub of the C-97 kit(Academy, 1/72) part.
亂忋偲嵍4枃亃丄
俠宆偱偼僾儘儁儔偺宍忬傕俧宆乮僉僢僩晹昳乯偲堎側傞偨傔丄僉僢僩晹昳傪儀乕僗偵偟偰宍忬傪夵廋偟傑偟偨丅
傑偢僽儗乕僪偱偡偑丄俠宆偱偼暆偑嫹偄偺偱丄僉僢僩晹昳傪嶍偭偰嵶偔偟傑偟偨丅
傑偨僴僽乮拞怱偺弌偭挘傝乯偺宍忬傕俠宆偱偼墌摏宍忬偱嵶挿偄偨傔丄偦傟偵帡偰偄傞宍忬偺C-97僉僢僩乮倍棉邪乯偺僾儘儁儔偐傜棳梡偟傑偟偨丅
忋抜拞墰偺幨恀偱偼丄嵍懁偺僾儘儁儔偼僉僢僩晹昳乮俧宆乯丄塃懁偼僽儗乕僪傪嵶偔嶍傝崬傫偩俠宆偺僾儘儁儔偱偡丅
.
Tailplane丂悈暯旜梼


(above 4 photos),
The horizontal tailplane, the elevator and the trip tabs are molded in one piece on the kit parts as shown on the top left photo.
I separated these moving surfaces at first and put them back to the tailplane in the lowered position as shown on the bottom right photo,
because many of the C-119 photos pictured on the ground showed the elevator in the lowered position.
The trim tab actuator is placed on the under surface by using a bress wire as shown on the bottom left photo.
亂忋4枃亃丄
悈暯旜梼偵偮偄偰偼丄徃崀懬媦傃僩儕儉僞僽傪愗傝棧偟丄壓偘埵抲乮僩儕儉偼忋偘埵抲乯偵屌掕偟傑偟偨丅
偙傟偼嶌昳偵彮偟曄壔傪梌偊偨偄偨傔偲丄幚嵺偺C-119傪抧忋偱嶣偭偨幨恀傪尒傞偲丄僄儗儀乕僞乕偑悅傟壓偑偭偰偄傞応崌偑懡偄偐傜偱偡丅
僩儕儉僞僽偺傾僋僠儏僄乕僞乕偼恀鐹朹偲庽帀曅傪巊偭偰徃崀懬壓柺偵庢傝晅偗傑偟偨乮壓嵍幨恀乯丅
.
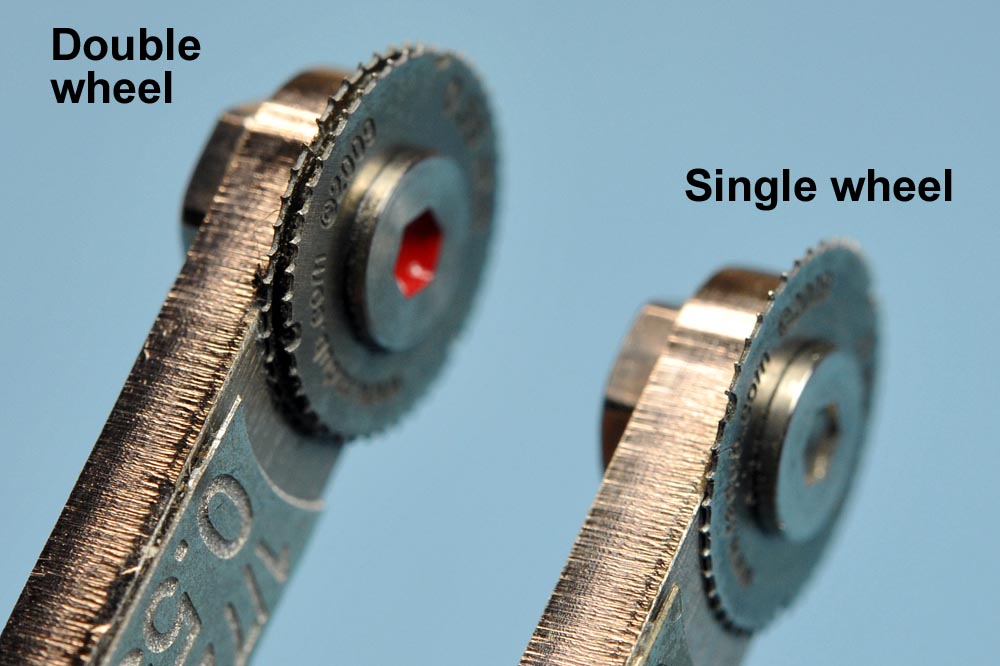
Riveting丂儕儀僢僩懪偪


(above 4 photos),
The top two photos show the wheel-type riveting tool I used during the C-119 project.
This riveting tool works very good and I can recommend you to use the tool.
I engraved fine rivet lines all over the surfaces as shown on the bottom two photos after I applied "Mr.Surfacer 1200" allover.
亂忋4枃亃丄
忋抜俀枃偺幨恀偼彫惗偑儕儀僢僩懪偪偵巊偭偨僐儘僐儘幃儕儀僢僩懪偪岺嬶偱偡丅
旕忢偵巊偄彑庤偺椙偄岺嬶偱奆偝傫偵偍姪傔偱偒傑偡丅僱僢僩偱峸擖壜擻偱偡丅
梼傗摲懱偑傑偩僶儔僶儔側忬懺偱僒乕僼僃乕僒乕傪昞柺偵悂偄偨屻偵丄儕儀僢僩傪慡懱偵懪偪傑偟偨丅
.
Boom band丂僽乕儉偺僶儞僪

 (3 photos),
The top two photos, which I pictured at aviation museum, show the metal band seen on the twin-boom of the C-119.
The bottom left photo shows my C-119 model which depicts the boom band on the right boom.
(3 photos),
The top two photos, which I pictured at aviation museum, show the metal band seen on the twin-boom of the C-119.
The bottom left photo shows my C-119 model which depicts the boom band on the right boom.
亂忋偲嵍偺俁枃亃丄
忋抜俀枃偺幨恀偼彫惗偑攷暔娰偱嶣偭偨幨恀偱偡偑丄幚婡偱偼僽乕儉偺慜晹偲屻晹偵曗嫮梡乮丠乯偺嬥懏僶儞僪偑姫偐傟偰偄傑偡丅
偙傟傪彫惗偺儌僨儖偵偦傟傜偟偔嵞尰偟偨乮惓妋偵偼僨僢僠偁偘偨乯幨恀偑壓抜嵍偺幨恀偱偡丅
.


(above 6 photos),
At first I glued a thin plastic belt around the boom as shown on the top most-left photo.
Then, I made some flattened solder wire to add on the boom band.
The above photos show the assembly process how I made the boom band.
亂忋6枃亃丄
僽乕儉偵姫偒晅偗傜傟偨嬥懏僶儞僪傪儌僨儖忋偵偳偺條偵僨僢僠忋偘偨偐丄傪忋俇枃偺幨恀偱帵偟傑偟偨丅
傑偢偼嵍忋幨恀偺擛偔僾儔僗僩儔僀僾傪僽乕儉偵姫偒晅偗傑偟偨丅
偦偺忋偐傜丄巺敿揷傪捵偟偰嶌偭偨彫曅傪丄僾儔僗僩儔僀僾偺忋偵丄儕儀僢僩儔僀儞偵崌傢偣偰庢傝晅偗傑偟偨丅
.
Hot air vent丂僄傾儀儞僩


(above 4 photos),
There are five heaters compartment vent on the fuselage roof, and the kit mold for the vent is so poor as shown on the bottom left photo.
So I made the vent by using thin aluminium sheet. At first, I made a recessed dent on the base board as shown on the top left photo,
and I pressed down and formed the aluminium sheet over the dent by using the toothpick.
Then, I cut the vent in shape and glued it on the fuselage roof as shown on the bottom right photo.
亂忋4枃亃丄
摲懱偺忋偵僸乕僞乕僐儞僷乕僩儊儞僩偺儀儞僩偑俆儢強偱弌偭挘偭偰偄傑偡丅
僉僢僩偺儌乕儖僪偱偼乮壓抜嵍偺幨恀乯儀儞僩偺奐岥晹偑嵡偑偭偰偄傞偺偱丄敄偄傾儖儈斅偱嶌傝捈偟傑偟偨丅
嵍忋偺幨恀偺擛偔丄儀儞僩宍忬偵挙傝崬傫偩墯傒偺忋偐傜傾儖儈斅傪捾梜巬偱墴偟崬傫偱丄儀儞僩偺宍傪嶌傝傑偟偨丅
偦偺儀儞僩偺捈偖屻曽偵偁傞係杮偺攔婥岥乮墝撍忬乯偼怷椦徚壩婡偱偼庢傝奜偝傟偰偄傞偨傔丄偦偺晹暘偼嶍傝庢傝傑偟偨乮壓抜塃幨恀乯丅
.
Sunshade curtain丂揤奧僇乕僥儞


 (4 photos),
I used an aluminium foil for kitchen use to make the sunshade curtain. I placed the foil around the pin vise grip and pressed the foil on the grip by hand.
The foil was easily formed just like the shape of the curtain as shown on the bottom left photo.
(4 photos),
I used an aluminium foil for kitchen use to make the sunshade curtain. I placed the foil around the pin vise grip and pressed the foil on the grip by hand.
The foil was easily formed just like the shape of the curtain as shown on the bottom left photo.
亂忋偲嵍係枃亃丄
僉儍僲僺乕揤奧晹偺擔彍偗僇乕僥儞傪偳偆傗偭偰嶌傠偆偐偲怓乆偲帋偟偨偺偱偡偑丄
僺儞僶僀僗偺暱偵傾儖儈僼僅僀儖乮戜強梡乯傪姫偒晅偗偰丄僊僓僊僓忬偺僔儚傪晅偗傞偺偑堦斣娙扨偲偺寢榑偵側傝傑偟偨丅
傕偆偪傚偭偲僔儍乕僾偵愜傝崬傒偨偐偭偨傫偱偡偑丄壗偣1/72側傫偱丄彫惗偵偼偙傟偑惛堦攖偱偡丅
.
Jet engine丂僕僃僢僩僄儞僕儞


 (4 photos),
The Hasegawa P2V-7 kit(1/72) has a pair of jet engine parts, which I carried over to my C-119 project.
I separated the engine pod from its pylon and I modified the shape of the P2V-7 pylon to the C-119 shape as shown on the above photos.
(4 photos),
The Hasegawa P2V-7 kit(1/72) has a pair of jet engine parts, which I carried over to my C-119 project.
I separated the engine pod from its pylon and I modified the shape of the P2V-7 pylon to the C-119 shape as shown on the above photos.
亂忋偲嵍係枃亃丄
怷椦徚壩婡偱偼摲懱偺忋偵曗彆僕僃僢僩僄儞僕儞偑捛壛偝傟偰偄傑偡丅偦傟偼偪傚偆偳僴僙僈儚偺P2V-7僉僢僩偵晅偄偰偄傞僄儞僕儞偲摨偠宍忬偱偁傝丄偦偺傑傑棳梡偟傑偟偨丅
扐偟丄忋壓偑媡偺庢傝晅偗偱偁傝丄僷僀儘儞傪愗傝棧偟偰丄僷僀儘儞宍忬傪C-119梡偵崌傢偣偰嶌傝捈偟傑偟偨丅
.
Landing light丂拝棨摂


 (3 photos),
The light lens I used is available at a hobby shop in Tokyo.
The clear front cover for the landing light was made out of a PVC sheet by heat press process.
I used a brass sheet for the light shielding plate immediate inboard side of the landing light.
(3 photos),
The light lens I used is available at a hobby shop in Tokyo.
The clear front cover for the landing light was made out of a PVC sheet by heat press process.
I used a brass sheet for the light shielding plate immediate inboard side of the landing light.
亂忋偲嵍俁枃亃丄
拝棨摂偼亀偝偐偮偆亁偱峸擖偟偨儔僀僩儗儞僘傪巊偄傑偟偨丅
拝棨摂偺慜柺摟柧僇僶乕偼墫價斅偺僸乕僩僾儗僗偱嶌傝傑偟偨丅
拝棨摂偺捈偖撪懁偵棫偭偰偄傞幷岝斅偼丄僉僢僩偺暘岤偄斅傪愗傝庢偭偰丄0.3儈儕偺恀鐹斉偵戙偊傑偟偨丅
.
Main landing gear丂庡媟


 (3 photos),
I added a lot of details on the main landing gear, including the brake pipe(brass wire), the wiring harness(solder wire) and the torque arm(plastic strip)
as shown on these photos. I also added some structural frames by using plastic rods/strips.
(3 photos),
I added a lot of details on the main landing gear, including the brake pipe(brass wire), the wiring harness(solder wire) and the torque arm(plastic strip)
as shown on these photos. I also added some structural frames by using plastic rods/strips.
亂忋偲嵍俁枃亃丄
庡媟偼僉僢僩晹昳偩偗偱偼梋傝偵傕僔儞僾儖側偺偱丄怓乆偲僨傿僥傿乕儖傪嶌傝崬傒傑偟偨丅
僽儗乕僉僷僀僾乮恀鐹慄乯丄儚僀傾儕儞僌僴乕僱僗乮敿揷慄乯丄僩儖僋傾乕儉乮庽帀曅乯丄媟拰僼儗乕儉乮庽帀朹乯側偳傪捛壛偟傑偟偨丅
僽儗乕僉僷僀僾偺庢晅偗僽儔働僢僩偼捵偟偨敿揷慄傪巊偭偰偄傑偡丅
.
Cabin door丂忔崀僪傾


 (4 photos),
The interior side of the cabin door for the C-119 transport was covered by the quilted soundproofing material,
and the Italeri's door part is molded in that shape (see the top left photo).
However, the soundproofing material was removed from the fire fighting C-119.
So, I changed the shape of the door interior as shown on the photos above.
The fire extinguisher was added.
(4 photos),
The interior side of the cabin door for the C-119 transport was covered by the quilted soundproofing material,
and the Italeri's door part is molded in that shape (see the top left photo).
However, the soundproofing material was removed from the fire fighting C-119.
So, I changed the shape of the door interior as shown on the photos above.
The fire extinguisher was added.
亂忋偲嵍4枃亃丄
堦斒桝憲婡宆偺C-119偱偼丄僪傾撪柺偵杊壒嵽乮僋僢僔儑儞乯偑撪挘傝偝傟偰偍傝丄僀僞儗儕偺僉僢僩晹昳偱傕偦偺條偵儌乕儖僪偝傟偰偄傑偡丅
偟偐偟怷椦徚壩婡僞僀僾偱偼丄撪挘傝偑攳偑偝傟偰丄僪傾偺峔憿嵽乮崪慻傒乯偑業弌偟偰偄傑偡丅
偦偙偱丄偦偺幚婡幨恀傪尒側偑傜丄撪懁偺傒傪嶌傝捈偟傑偟偨丅僪傾偺愒偄徚壩婍偑傾僋僙儞僩偵側傝傑偟偨丅
.
Water bay door丂悈僞儞僋僪傾


 (3 photos),
I took the above two photos at Pima Air Museum, and these photos show the details of the water bay doors.
A lot of the C-119 walk-around photos taken at the Pima Museum are shown on the walk-around section of this website.....(click HERE) .
I engraved the panel lines for the water bay doors as shown on the bottom left photo.
(3 photos),
I took the above two photos at Pima Air Museum, and these photos show the details of the water bay doors.
A lot of the C-119 walk-around photos taken at the Pima Museum are shown on the walk-around section of this website.....(click HERE) .
I engraved the panel lines for the water bay doors as shown on the bottom left photo.
亂忋偲嵍俁枃亃丄
忋抜俀枃偺幨恀偼彫惗偑Pima Air Museum偱幚嵺偺C-119怷椦徚壩婡偺摲懱壓柺傪嶣偭偨幨恀偱偡丅
偙傟埲奜偵傕摉奩婡偵偮偄偰戲嶳偺嵶晹幨恀傪摉HP偺嵶晹幨恀僙僋僔儑儞乮僋儕僢僋乯 偵宖嵹偟偰偍傝傑偡丅
僺儅偱幚婡傪挷嵏偟偨惉壥傪婎偵偟偰丄摲懱壓柺偵僪傾偺奜榞偺嬝挙傝傪巤偟丄儕儀僢僩傕懪偪崬傒傑偟偨丅
.
Other small parts丂懠彫暔晹昳


(Above 3 photos),
The above left photo shows the flap hinges which was made of the brass wire and the plastic piece.
The above middle photo shows additional small details placed on the under surface of the outboard wing which I made of brass wire/strip.
The above right photo shows some other small parts which I made of brass wire/pipe or small plastic pieces.
亂忋3枃亃丄
嵍忋偺幨恀偼帺嶌偟偨僼儔僢僾丒僸儞僕偱偡丅僉僢僩晹昳偱偼偙偺曈偺僨傿僥傿乕儖偑慡偔柍帇偝傟偰偄傑偡丅
忋拞墰偺幨恀偼奜梼壓柺偺嵶晹僨傿僥傿乕儖偱偡丅偙傟傜偼僉僢僩晹昳偱傕儌乕儖僪偝傟偰偄傑偡偑丄偦傟傪愗傝庢偭偰僔儍乕僾偵嶌傝捈偟傑偟偨丅
塃忋偺幨恀偼婡懱偵庢傝晅偗傞傾儞僥僫椶傗僺僩乕娗丄儚僀僷乕丄攔婥娗側偳偺彫暔晹昳傪暲傋偰偄傑偡丅懡偔偼恀鐹嵽偱帺嶌偟偰偄傑偡丅
.
Painting process丂揾憰岺掱


(Above 2 photos),
After riveting on all surfaces, I painted gloss white overall at first.
亂忋2枃亃丄
僒乕僼僃乕僒乕傪悂偄偰丄儕儀僢僩懪偪偟偨屻偵丄婡懱慡柺傪僣儎桳傝偺敀偱揾傝傑偟偨丅
.


(Above 2 photos),
Then I painted gloss orange-red over the white surface.
亂忋2枃亃丄
師偵丄儅僗僉儞僌傪偟偨屻偵丄僣儎桳傝愒乮僆儗儞僕乯傪悂偒晅偗傑偟偨丅
.


(Above 2 photos),
Then I painted gloss black on the fuselage and the forward portion of the booms.
亂忋2枃亃丄
師偵丄儅僗僉儞僌傪偟偨屻偵丄婡庱丄摲懱忋柺媦傃僽乕儉慜晹偵僣儎桳傝崟傪悂偒晅偗傑偟偨丅
.


(Above 2 photos),
Finally, I painted silver overall.
亂忋2枃亃丄
嵟屻偵丄傾僠僐僠傪儅僗僉儞僌偟偰偐傜嬧傪悂偒晅偗傑偟偨丅
.


(Above 2 photos),
Finally, I removed all the masking tapes.
亂忋2枃亃丄
儅僗僉儞僌僥乕僾傪攳偑偡偲丄婎杮揾憰偼傎傏廔傢傝偱偡丅
.
Finally completed丂偮偄偵姰惉
Outdoor Photography丂壆奜嶣塭乮偍壘偺崙僙僢僩乯


Indoor Photography丂壆撪嶣塭


Nose Section丂婡庱晹


Fuselage丂摲懱


Wing丂庡梼


 Undersurface
of the wing
庡梼壓柺
Twin-boom丂憃僽乕儉


Under-surfaces丂婡懱壓柺


Afterword 偁偲偑偒


I'm quite satisfied with the results of my C-119 project, especially the silver paint duplicating the natural metal finish of the C-119.
I used several tones of silver colour and I painted them panel by panel separately to duplicate the natural metal finish of the C-119.
The fine rivet line applied on the silver surface was shown in very realistic fashion especially under the direct sunshine.
I was very lucky to be able to find the decal sheet for the Hemet Valley C-119 released from the DRAW decal, and
I deeply appreciated the DRAW decal for their release of this sheet.
However, I was not happy with the quality of the DRAW's digital silk decal.
The ink was quite thick and it was not soften enough even after I applied the hot towl over the decal.
The surface of the ink was quite rough.
So, I do not recommend you to use the decal in case the surface of your model are not smooth and flat.
崱傑偱偢偭偲宧墦偟偰偄偨柍揾憰嬧偺婡懱偵崱夞弶傔偰挧愴偟偰傒傑偟偨丅
儀乕僗揾椏偲偟偰偼怓乆帋偟偨寢壥丄僋儗僆僗偺SM01僗乕僷乕僼傽僀儞僔儖僶乕傪巊偄傑偟偨丅
SM01傪儀乕僗偵偟偰丄悢庬椶偺嬧傪嶌傝丄僷僱儖枅偺揾傝暘偗傪偟傑偟偨丅
巊偄屆偟偨C-119偺嬧揾憰偲偟偰偼丄慡懱偵偪傚偭偲岝戲偑嫮偡偓偨偺偱丄嵟屻偵偮傗徚偟嵻傪彮偟擖傟偨僋儕傾乕傪僩僢僾僐乕僩偲偟偰悂偒傑偟偨丅
峏偵偼丄嵶偐偄儕儀僢僩傪慡柺偵懪偭偨偺偱丄嵟弶偵嶌偭偨柍揾憰婡偲偟偰偼堦墳崌奿揰偐側偁乣偲丄帺暘彑庤偵娒偄帺屓昡壙傪偟偰偄傑偡丅
DRAW僨僇乕儖偝傫偐傜Hemet Valley偺C-119偺僨僇乕儖傪敪攧偟偰捀偄偨偺偼戝曄姶幱偟偰偄傑偡偑丄
僨僇乕儖偺幙偼偐側傝僸僪僀傕偺偱偟偨丅偲偵偐偔僀儞僋偑暘岤偔偰丄忲偟僞僆儖偱抔傔偰傕偁傑傝廮傜偐偔側傝傑偣傫丅
傛偭偰丄撌墯偺昞柺偵偼慡偔撻愼傒傑偣傫丅DRAW僨僇乕儖偼傕偆擇搙偲巊傢側偄偲巚偄傑偡丅
偰側偙偲偱丄偙傟偐傜偼柍揾憰嬧偺婡懱傪怓乆偲嶌偭偰偄偒偨偄偱偡丅儅僕僗僥乕儖偲偐F-100偲偐C-54側傫偰丄柍揾憰嬧偑僺僢僞儕偱偡丅
Top of this page
the Previous page
TOP Page
偙偺儁乕僕偺Top傊
慜偺儁乕僕傊
Top儁乕僕傊